- Click this link to see the PythonTutorialThree.python starter file
- Copy the contents into notepad
- Save the notepad file using the name PythonTutorialThree.py
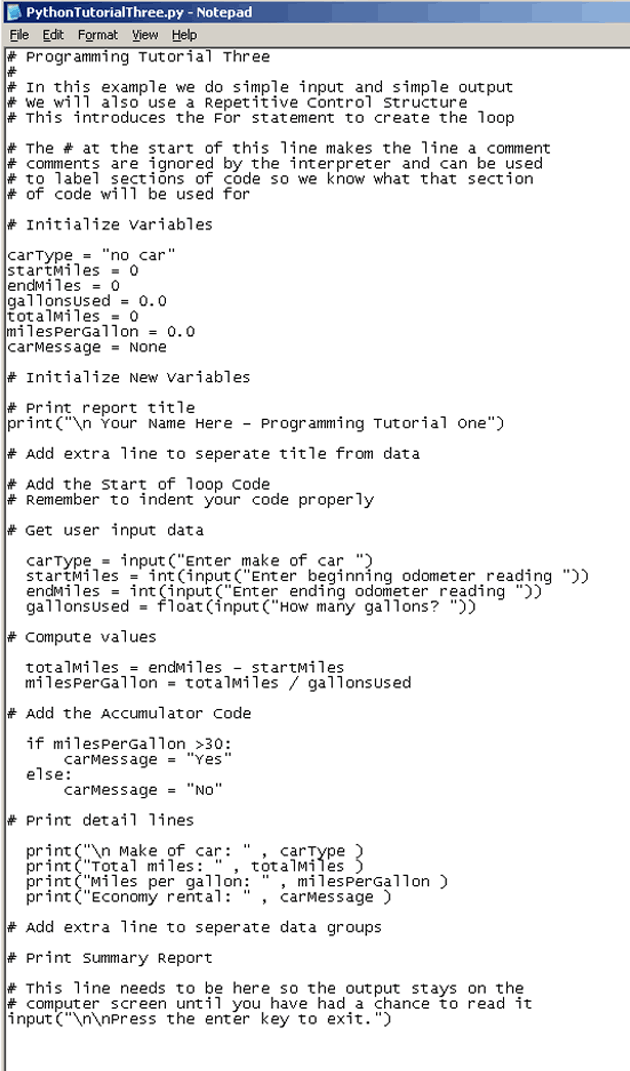
- Open the file using the notepad application (TextEdit if you are on a Mac)
- Your file should look something like this ---->

-
Enter the code shown below after the comment that says "Initialize New Variables"
carIndex = 0
mpgAccumulator = 0
averageMPG = 0
What are these new variables?? The first one (carIndex) is the loop coutner. It will keep track of what loop we are on. The second one (mpgAccumulator) allows us to add a value from each loop to get a total at the end. We need this to get the average MPG. The last variable (averageMPG) is where we will put the average MPG value when we calculate it.
- It is common for a program to have some sort of title that tells the user what the program does and it might include the name of the person (or Company) who wrote the program.
-
Enter the code shown below after the comment that says "Print Report Title"
print("\n Your Name Here - Programming Tutorial Three")
- Now you want to add extra spaces between your output data.
-
Enter this code shown below after the comment that says "Add extra line to separate title from data"
print("\n")
- Now we need to set up our loop so we can perform our input calculations and output multiple times. To do this we will use a "for" statement.
-
Enter the code shown below after the comment that says "Add the start of loop code"
for carIndex in range(3):
- Now we need to ask the user for the input data. When data comes into the program, we need to make sure that the computer understands what type of data it is. In Python the computer will assume the data is a character string unless we specify or cast the data as something else. If we want the data to be an integer, we will wrap the input statement in an int() cast telling the computer to interpret what the user enters as an integer. If we want the number to show fractions of a whole number (the term is floating point) we will use a float() cast.
-
Enter the code shown below after the comment that says "Get User Input Data"
carType = input("Enter make of car: ")
startMiles = int(input("Enter beginning odometer reading: "))
endMiles = int(input("Enter ending odometer reading: "))
gallonsUsed = float(input("How many gallons? "))
- It is now time for the program to do some calculations. As it turns out we have 2 kinds of calculations in this program: 1) a calculation of user input data and 2) a calculation of a variable that has itself been calculated by this program. The first type of calculation I can do whenever I want to but I must do the 2nd type of calculation after I have performed the calculation required as its input. Lets see what I mean:
-
Enter the code shown below after the comment that says "Compute Values"
totalMiles = endMiles - startMiles
- Notice that the variable "totalMiles" is derived from 2 variables previously entered by the user – endMiles and startMiles, so I can place this code anywhere after the "User Input" section of the program.
-
Enter the code shown below after the comment that says "Compute Values" AND after the code entered in the previous step.
milesPerGallon = totalMiles / gallonsUsed
- Notice that one of the variables here (totalMiles) was not entered by the user, it was calculated in the previous step, So this code must come after the code in the previous step or the totalMiles variable will be incorrect.
- In this example we need to gather information from each time we run through the loop (this is called an iteration of the loop.) We want to collect the total miles per gallon for each vehicle and add them together, then at the end of the program we can perform an average of all the vehicles.
-
Enter the code below after the "Add the Accumulator Code" comment to collect the total from each iteration in the loop so we can
average them at the end of the program.
mpgAccumulator = mpgAccumulator + milesPerGallon
-
Enter the code shown below after the comment that says "Compute Values" AND after the code entered in the previous step.
if milesPerGallon > 30:
carMessage = "Yes"
else:
carMessage = "No"
- Same comment from the last section, the variable milesPerGallon was calculated in the last step, so this step must come after it.
Notice that when you print something back to the screen you have to specify if it is just a label for a variable (a text string) or the variable itself. The example below shows the text string labels wrapped in double quotes ("Text String") and the variables listed without any quotes.
-
Enter the code shown below after the comment that says "Print Detail Lines"
print("\n Make of car: " ,carType)
print("Total miles: " ,totalMiles)
print("Miles per gallon: " ,milesPerGallon)
print("Economy rental: " ,carMessage)
- Again you want to add extra spaces between your output data.
-
Enter this code shown below after the comment that says "Add extra line to separate title from data"
print("\n")
- We have one more calculation to do. We would like to find the average miles per gallon of all of the vehicles processed. To do this we will use the accumulated variable in an earlier step.
-
Copy the code shown below after the "Print Summary Report" comment
averageMPG = mpgAccumulator / 3
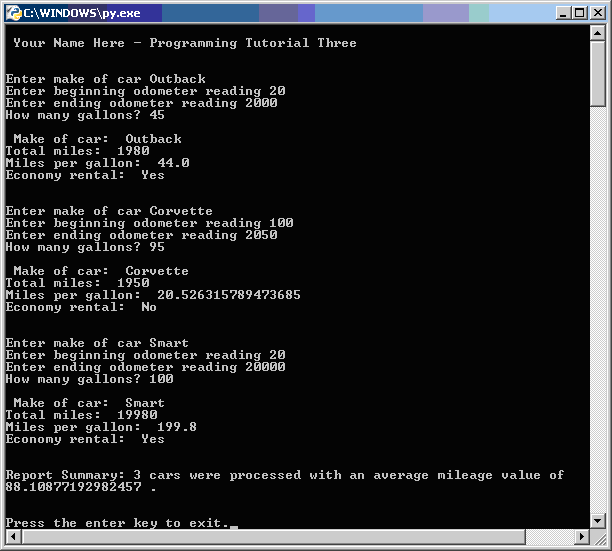
print("Report Summary: \n")
print("3 cars were processed with an ")
print("average mileage value of " ,round(averageMPG, 2), ".")
- Save your program to your student disk. Change the name of the program so you know this is the completed version. Note: Be sure the name ends with ".py" — this is what lets the Python Interpreter identify and run your program.
