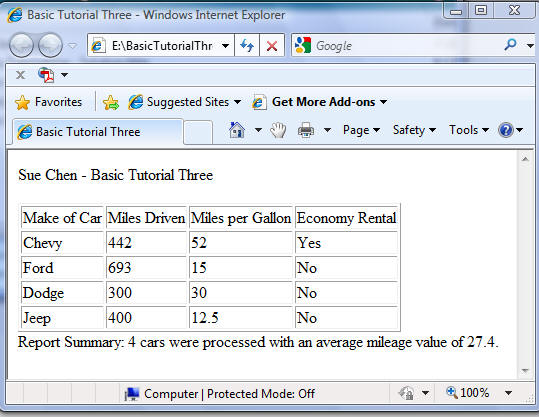
| In this tutorial you will once again modify the Rental Car program. As in the earlier programs, you will have the user enter the four data items for each car, and as before, the program will calculate the total miles driven and the miles per gallon and display that data in a short report on the screen. |
| This time your program will allow the user to enter data for as many rentals as needed instead of a fixed number (such as 3 rentals in the previous tutorial.) When the program first starts up, it will ask the user to enter the number of car rentals to be processed during the run. It will use the VBasic for/next loop to run through the input, process and output steps for each car until all of the rentals have been processed. | |
| This tutorial also introduces the use of the Display Table Row Statements to allow for printing date in columns under specific column headings within a table. | |
| As in Tutorial Two, at the end of the report table, after all of the rentals have been listed, your program will print summary information including the number of rentals processed and the average mileage obtained by all vehicles reported. This tutorial also introduces the round() function to round the resultant average miles per gallon to the nearest tenth (i.e. 32.3 rather than 32.3333). | |

|
|
| Follow the steps outlined below to create and run this VBasic application. | |
| Note: the BASIC Reference Guide can be download from this link. It identifies the VBasic instructions you will use coding in these four programs. | |
|
|
| You will need the same variables you used in the previous program (i.e. carType, startMiles, endMiles, gallonsUsed, totalMiles, milesPerGallon, carMessage, carIndex, mpgAccumulator and averageMPG), which already have been coded for you. You will also need to add a new variable (carsRented) which will be used as the End Value for determining when to end the for/next loop. |
After the existing variable declarations, enter the additional statement:
|
|||||
The report title and a following blank line appear next. Don't forget to change the student name. The
last statement in the Print report title section instructs the program to initiate the table. It has
already been coded for you.
|
|
The for/next statement, coded to control the number of times the program will loop, will need to be
modified to use the carsRented variable for the end-value instead of "3".
|
Next inside the loop comes the code for printing the detail lines, this time with each data item listed in its own column
(see column headings above.)
|
Printing the detail lines is teh last task your program needs to perform within the for/next loop.
|
You're almost done! You only need to modify the lines of code that calculate the average mileage of the rentals
and produce the report summary. Since the number of rentals for any particular run of the program is contained
in the carsRented variable, modify the Summary Report code to use carsRented instead of the number "3".
Also, you will apply the round() function to round the average miles per gallon to the nearest 10th.
|
Test your program in your browser
| ||||
| Once you have entered the last requested data, and if you have coded your program correctly, your program will produce the written report on the monitor and end. Be sure to verify the results with the image at the top of this tutorial. |
|