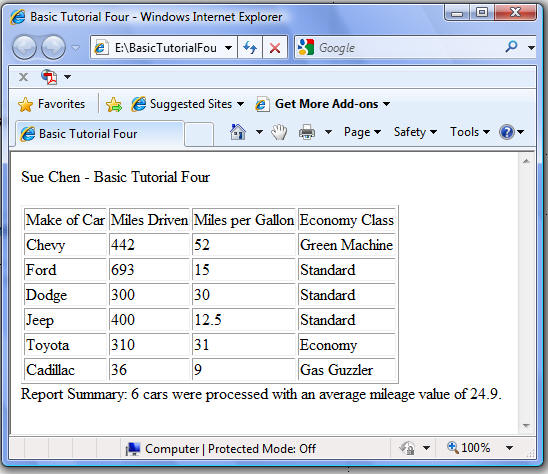
| In this tutorial you will once again modify the Rental Car program and just as in the last tutorial, you will be incorporating the variable controlled for/next loop for controlling the repetitive structure. As as in the last tutorial, you will use the Display Table Row Statements to display data in a table. |
| This tutorial introduces the select case/end select decision structure statements, which allows the program to decide what statements to do next, based on more than one possible value for a given variable. In this program you will use the select case statements to determine which of four Economy class categories the rental belongs to. A 'Gas Guzzler' gets 12 miles per gallon or less, and a 'Standard' car gets more than 12 up to a maximum of 30 miles per gallon. An 'Economy' car gets more than 30 miles per gallon, but less than a 'Green Machine' which gets 50 miles per gallon or more. | |
| As in the previous tutorial, after all of the rentals have been listed, your program will print summary information including the number of rentals processed and the average mileage obtained by all vehicles reported. | |

|
|
| Follow the steps outlined below to create and run this VBasic application. | |
| Note: the BASIC Reference Guide can be download from this link. It identifies the VBasic instructions you will use coding in these four programs. | |
|
|
||||||||||
| The program will no longer just display "Yes" or "No" in the last column. It will display one of four possible economy classes. Modify the code in the Print column heading section of your program so that the last column displays 'Economy Class' rather than 'Economy Rental'. | ||||||||||
|
In the Compute values sections of your program replace the current if/else/end if code with the
code to select the correct category based on the rental car's miles per gallon.
Note that the order of the tests (cases) is important , because the failure of the first case sets
the minimum value for the second case. That is, a car with 15 miles per gallon will fail the first
case ('are milesPerGallon less than or equal to 12?') so that when the program evaluates the next case
('are milesPerGallon less than or equal to 30') it already knows the milesPerGallon are greater than 12.
Congrats!! You are done making modifications.
|
Test your program in your browser
| ||||||
|
Once you have entered the last requested data, and if you have coded your program correctly, your
program will produce the written report on the monitor and end.
Be sure to verify the results with the image at the top of this tutorial. |
|